Merry Christmas and Happy New Year. I hope that everyone is having a great week and celebrating life with your family. I decided to make a bright and colorful prayer flag so that I would be reminded of the Joy of the holiday season all year long.
I started with a piece of muslin on which I had printed a single layer mono-print. 
I used the Celestial Stencil to add some bright patterning to the flag.

Over the top of that I add another texture layer using the Picasso stencil from the TEXTures 2 series.

I folded over the top of the prayer flag and stitched it down with embroidery floss to make a hanging pocket. I added the word joy by couching down some recycled silk fibers. They add wonderful texture and a fun look. I stitched around the word with white thread so that it stood out from the background more. I added a few more stitches here and there for extra interest. I added some ribbon that I dyed to the bottom of the flag to finish it off.
 
Here is a photo that I took in better lighting.

Here are some prayer flags hanging above my desk. I made some of them and some I received in a prayer flag exchange.

You can see
more of my art at my website www.handsandharts.com
Have a wonderful weekend.
Janelle |


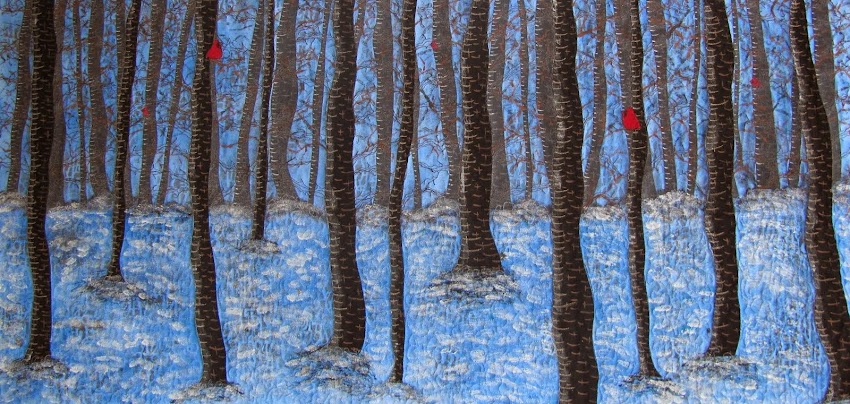
This quilt was inspired by views of the forest in the northern winters and the cardinals that I see outside of my window during the cold months.
I'm happy to get to play with Jill K. Berry's new stencils. I love her TEXTures series and this TEXTures 2 series is just as fun. At the end of this post I will let you know how you can enter to win a set of the TEXTures 2 stecils.
I wanted to play with these stencils on fabric and see what I could come up with. They work on fabric just as well as any other substrate and added a lot of atmosphere to the piece that I made.
I started with a piece of white cotton that was 44" by 22". I sprayed my fabric with water and applied color with a Derwent Inktense block in iris blue. I used textile medium and more water to spread out the color over the whole piece of fabric.

Then I got out the TEXTures stencils and using the Picasso and Miro stencil I began to spray my fabric through the stencils. I used my homemade ink sprays, a mixture of water and Daler-Rowney FW Acrylic Water-Resistant Artists Ink with a bit of paper glaze to fix the color. I first used my process cyan spray because the color was just a bit different than the blue of my fabric. I wanted to add subtle texture to my background. Then I used my pearlescent black spray to spray through the other stencil. This time I covered much more of the fabric because I wanted to create the feel of underbrush on a forest floor. Since I am making a wall hanging that isn't meant to be washed I didn't worry about using these ink sprays, but I did heat set the fabric after these layers were dry.


Next I wanted to add texture to the black fabric that I was going to use for tree trunks. I sprayed the fabric pieces, through the same two stencils, with a white pearlescent ink spray and a sepia ink spray that I mixed in gold fabric paint as well. These didn't show up well, but I was just trying to add some more subtle texture.


I added a Wonder Under fusible web to the back of both of the black fabric pieces, so that I could fuse the tree trunks to the quilt after I cut them out. I cut out two layers of trees and fused the first layer to the quilt when I had them arranged the way that I wanted them. I used the black with the white spray in the background layer. Then I painted lines on the trees for the bark using fabric paint in white and grays. I also cut out some basic cardinal shapes from red fabric and fused them down too, after the paint was dry.

Next I painted a bit of detail on the cardinals and I painted branches for the trees. After the paint was dry I put a layer of the fusible web over these trees and a layer of white tulle over the top of the fusible web. I ironed these down so that they were all fused. If you try this make sure that you follow the directions and have a pressing sheet between your iron and the fabric. Otherwise you get glue all over your iron that is a pain to clean off. I added the white tulle so that these trees felt a bit misty and further away.


I followed the same process for the foreground trees except I used the black fabric sprayed with the sepia spray and I used paints in shades of browns for the details.


I stitched the cardinals down with some red thread to make sure that the fusible wouldn't come up and it added a nice touch to the quilt. I love the texture that hand stitching gives to a textile piece.

I added snow, with white fabric paint, to the ground and along the edges of the trees in the foreground.

Next I added a batting and backing fabric and used free motion stitching to add bark lines and branches to the foreground trees. I added white stitching to quilt the snowy ground as well. I still have to add a faced binding to finish the quilt, but that is going to take me a bit longer to do. I will share more pictures when I have the binding and the quilt sleeve added.


I hope that you enjoyed my art quilt tutorial and come back next week to read about my new project.
If you would like a chance to win these stencils go here to find out all the information.
If you would like a chance to win these stencils go here to find out all the information.
Janelle


